Lightroom Mobile 101 for iPhone Travel Photographers (No Desktop Required)
Traveling light doesn’t just mean packing fewer shirts — it means leaving your laptop at home and still coming back with pro-level photos.
Whether you’re editing a crisp iPhone shot of Florence from the back of a bus in Tuscany, or tweaking DSLR RAW files on a hotel balcony in Rome, Lightroom Mobile has officially grown up. The days of “I’ll edit when I get home” are over — you’ve got everything you need right in your hand.
This is for iPhone photographers, mobile-first travelers, and anyone who wants real control over their edits without dragging a laptop across the world. If you’ve ever wondered how to build a legit workflow on the go — import photos, organize them, apply presets, fine-tune details, and export with full control — this post walks you through it step by step.
So yeah, your phone just became your darkroom.
Why Lightroom Mobile is a Game-Changer in 2025
Lightroom Mobile isn’t just the “lite” version of desktop Lightroom anymore — it’s now a full-blown editing powerhouse in your pocket. And in 2025, Adobe’s latest updates have made it even smarter, faster, and easier to use, especially for iPhone travel photographers.

Let’s start with the headline feature: AI-powered editing tools. With just one tap, you can Select Subject, Sky, or Background — Lightroom figures out what you’re trying to isolate and creates a perfect mask in seconds. Want to brighten someone’s face without affecting the sky? Done. Want to bump the blues in just the ocean and nothing else? Easy.
It also plays nice with everything now. Whether you’re importing ProRAW or HEIC files from your iPhone, or editing your Sony/Canon RAWs via a USB-C adapter, Lightroom Mobile handles it like a champ. No more “wait until I get home to edit” excuses. Just shoot, import, and go.
One underrated upgrade? Smart Previews. Your photos sync across devices without eating up your cloud storage. You can start an edit on your phone, finish it on your laptop or desktop, and never worry about file versions again.
And if you’re someone who’s lost a camera card before (we’ve all been there), you’ll love this: Lightroom’s cloud backup system means your work is automatically safe. Even if your phone dies on a bus or takes a swim in Sicily, your edits — and your photos — are still intact.
Finally, Adobe’s 2025 mobile pricing actually makes sense. You can now get cloud-only plans without needing the full Creative Cloud suite, which means editing on the go is affordable, flexible, and scalable.
How to Import Photos into Lightroom Mobile (2025 Update)

Before you can edit like a pro, you’ve got to get your photos into Lightroom Mobile. The process is now smoother than ever, especially since most iPhones have finally made the switch to USB-C. That means faster imports, fewer dongles, and a lot less hassle on the road.
From your iPhone Camera Roll
If you’re shooting with your iPhone—especially in RAW or ProRAW—you can import directly from your camera roll. Open Lightroom, tap the plus sign to make a new album, then choose “Add Photos” and select the shots you want to work on.
From a mirrorless or DSLR camera
Plug your camera or SD card into your iPhone or iPad using a USB-C card reader. Lightroom will detect the files right away and let you import directly into your mobile library. No computer needed, no file juggling.
From a wireless drive
If you’re traveling with something like a GNARBOX or WD Passport Wireless SSD, you can transfer files to your iPhone via the Files app. Once they’re on your phone, just pull them into Lightroom as usual.
Stay Organized: Albums, Flags, and Ratings That Actually Help

If you’re importing hundreds of photos from a trip, Lightroom Mobile can either feel like your best friend—or a chaotic mess. The key to staying sane? A simple but solid organization system that saves time and helps your best photos rise to the top.
Start with albums. Create one for each trip, shoot, or theme—like “Italy 2025” or “Rome at Night.” You can even group albums into folders if you’re doing a longer trip with multiple stops. This keeps everything in one place without needing to scroll through your entire library.
Once your photos are in, it’s time to sort. Tap the little “i” with a circle around it in the upper left corner—next to Info and Rating—to bring up your sorting tools. From there, swipe up to flag your favorites (Pick) and swipe down to reject the obvious throwaways. These gestures are built-in and super fast. Want to go deeper? Use star ratings. Start with a quick round to tag your 3- or 4-star shots, then come back later to crown your 5-star selects.
For even more speed, copy and paste metadata like keywords, captions, and location info between similar shots. This little trick helps when you’re uploading to a blog, organizing a book layout, or just trying to remember where that random alleyway shot was taken.
Organized edits are easier to find, faster to polish, and way more useful when it’s time to tell the story.
Edit Like a Pro: Step-by-Step Lightroom Mobile Workflow (2025 Update)
Lightroom Mobile may look simple on the surface, but under the hood, it’s got everything you need to turn a good iPhone (or camera) shot into something worth printing, posting, or putting in your photo book. Here’s how to build a strong, repeatable editing workflow that works — no matter where you’re shooting.
Crop & Geometry
Always start here. Straighten your shot, fix any tilted lines, and decide your final crop.
If you’re shooting architecture or city scenes, Guided Upright is your best friend. Tap into Geometry, draw a few lines to define what should be straight, and Lightroom will do the rest. You can also manually rotate, scale, and fix distortion — perfect for correcting leaning buildings or ultra-wide lens warps.
Bonus: enable Constrain Crop to auto-trim empty white space created during perspective fixes.
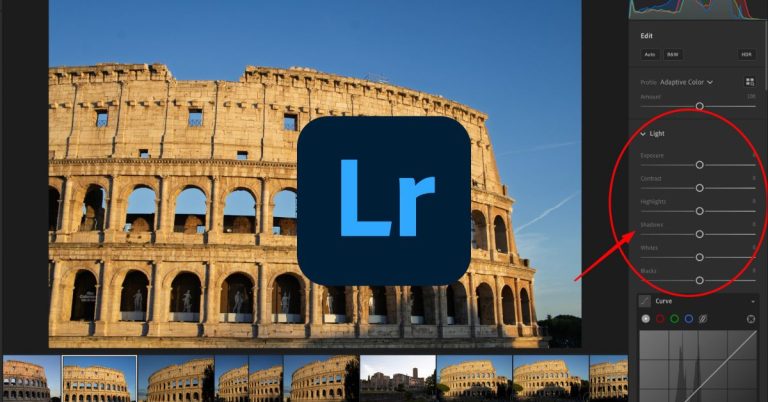
Light Panel
This is your exposure control center.
Start with Auto if you’re unsure — it’s smarter in 2025, using Adobe Sensei to read the image and set a decent starting point. Then fine-tune:
- Exposure for overall brightness
- Contrast for punch
- Highlights and Shadows to recover details
- Whites and Blacks to define your tonal range
Keep an eye on your histogram — even if it feels confusing at first. It shows the tonal range of your photo, from blacks on the left to whites on the right. Learning to glance at it helps you catch issues like blown-out highlights or overly dark shadows before they become a problem. You don’t need to fully understand it yet — just start looking.
To bring it up in Lightroom Mobile, use two fingers and tap-and-hold anywhere on the screen. You’ll see a colorful graph pop up across the top (like in the screenshot above). That’s your histogram. Over time, it becomes a trusted sidekick in your editing process.
Bonus: You can also tap the i-in-a-circle icon in the upper left corner (next to info and ratings) to toggle it on permanently.
Color Panel

Time to fix your color.
First, adjust White Balance — either with a preset (like Daylight or Cloudy) or using the Temp and Tint sliders. This helps remove strange color casts from mixed light.
Next, tweak Vibrance and Saturation. Vibrance protects skin tones and only boosts muted colors. Saturation boosts everything — so use it sparingly.

For more control, head to Color Mix (HSL). Here’s where you can tune individual colors — like making skies deeper blue, adjusting greens in foliage, or balancing red skin tones in harsh light.
Precision Edits with Masking Tools

This is where Lightroom Mobile earns its “pro” badge.
With the Masking Panel, you can now isolate:
- Subject (perfect for portraits or solo travelers)
- Sky (pull more drama or softness)
- Background (blur it out or dim distractions)
You can also use Brush, Radial, or Linear Gradient tools to fine-tune just about anything — like brightening a face or darkening an overexposed sky.


And the Remove tool (formerly called Heal) helps clean up distractions — think plastic bottles on a beach, stray tourists, or weird wall stains.
Tip: if something’s pulling attention away from your subject, it’s probably worth masking or removing.
Detail Panel

Finish strong with subtle texture and sharpness.
- Texture brings out details like stone, skin, or fabric without ruining the overall feel.
- Clarity boosts midtone contrast, but go easy — it can make photos look crunchy fast.
- Dehaze works wonders on foggy days, glare, or hazy skies.
Tip: if your photo looks “edited,” you’ve probably gone too far. Subtle wins every time — especially when you’re editing on a smaller screen.
Using and Creating Presets in Lightroom Mobile (2025 Update)

Presets are one of the easiest ways to make your edits faster and more consistent — especially when you’re working from your phone. Think of them like reusable filters, but better: they apply full edits (light, color, effects) in one tap, and you can still tweak everything afterward.
To use a preset, just open a photo and tap the Presets button at the bottom. You’ll see a list of all your User Presets — like the ones shown here: Bright, Griffin 1, B&W, etc. Tap through a few to preview how they look. Once you find one you like, tap the checkmark to apply it.
Want to make your own? After editing a photo you’re proud of, tap the three-dot menu in the Presets panel and hit “Create Preset.” Name it something useful (like “Golden Hour Rome” or “Soft Portrait”), select which settings to save (Light, Color, etc.), and it’ll be saved in your User Presets list for future use.
You can also import presets (.xmp or .dng files) directly through the app now — no desktop required. Just open the Presets panel, tap the three dots, and choose Import Presets. Grab the file from your Files app, and Lightroom will drop it into your collection automatically.
Tip: apply your preset first, then fine-tune it using masking, white balance, or other edits. Presets save time, but they’re just a starting point — not a one-click solution.
Over time, your preset library becomes your personal style toolkit. Whether it’s bold skies, soft skin tones, or moody cities, presets help your edits feel more intentional — and way easier to repeat.
Exporting and Sharing from Lightroom Mobile (2025 Edition)

So you’ve edited the shot — now what?
Lightroom Mobile makes it easy to share your work however you want, from a quick Instagram upload to high-res images ready for printing or your blog. No need to wait until you get home.
Start by tapping the Share icon (the box with an arrow) at the top of your screen. From there, you’ll see multiple options like “Save to device,” “Export as,” “Instagram,” and more.
If you want full control over your export settings, tap Export As. This is where you can customize:
- Resolution (full, medium, small)
- File type (JPG, TIFF, or original)
- Color space (sRGB is safe for the web)
- Image quality and compression
- Add your watermark (great for brand consistency)
You can even save your favorite settings as a custom export preset — perfect if you’re regularly exporting for different uses. For example:
- A version for Instagram Stories with medium resolution and a watermark
- A high-quality export for your blog with no watermark
- A TIFF file in AdobeRGB for large-format printing
You can send photos straight to apps like Instagram, Photoshop, Google Drive, or SmugMug — or just save a copy to your Camera Roll or Files.
Want to show your edit process or share a web version? Use the “Share on web” or “Share your edit process” options directly from the same screen.
And if you’re on iOS: You can create a Shortcut that automatically exports, resizes, and launches Instagram — all in one tap. Once you’ve got a solid edit, getting it out into the world is smoother than ever.
Real-World Mobile Editing Workflow
Let’s say you’re on a train leaving Florence, scrolling through the morning’s shots of the Duomo just as Tuscany starts blurring past your window. You’ve got 20 minutes before the next stop—and one killer sky you want to post.
Here’s how Lightroom Mobile makes that edit happen in real life, fast:
- Import: You grab the photo from your Camera Roll or SD card (if you shot it on a mirrorless). Lightroom syncs it into your “Italy 2025” album.
- Flag: You swipe up to “Pick” it — because it’s clearly better than the other three angles you tried.
- Quick Fix: Open the Masking panel, tap Select Sky, and lower highlights to recover detail. Add a touch of warmth to make the light feel like Florence.
- Preset: You apply your custom “Italy Warm Morning” preset to bring in soft contrast and subtle pop.
- Tweak: Lower saturation a hair, adjust the white balance, and use Remove to zap that random seagull flying across the dome.
- Export: Hit Export As, choose your IG-ready settings with watermark on (or off), and save it to your Camera Roll.
By the time the conductor checks your ticket, you’ve edited and exported a shot worthy of your feed, portfolio, or travel blog. And you never opened your laptop.
That’s the power of a real mobile workflow: you’re not tied to a desk, and your best work still gets out into the world — fast, polished, and yours.
Final Tips for Better Edits on the Go
You don’t need a studio setup or a thousand-dollar monitor to make great edits on your phone — but a few smart habits can make a big difference.
Clean your lens. It sounds obvious, but most mobile shots suffer from fingerprints and haze before you even open Lightroom. A smudge-free lens = sharper edits from the start.
Turn on gridlines in your iPhone camera and make sure you’re leveling your horizons when you shoot. A straight photo is way easier to work with than fixing bad geometry after the fact.
When you’re editing on the go, use one hand for adjustments and rest your phone on something stable — a tray table, armrest, or even your knee. It reduces errors and lets you focus on the image.
Finally, save your best edits as presets. If you love the way you processed those sunset cliffs or city lights, lock it in for the next round. You’ll build a consistent look faster, and save yourself a ton of time.
Edit Like a Pro, Wherever You Are
In 2025, Lightroom Mobile isn’t just a watered-down backup tool — it’s a full-featured editing studio in your pocket. With AI-powered tools, powerful presets, and cloud syncing that actually works, you don’t have to wait until you’re home to start creating.
Whether you’re on a train through Italy, catching golden hour in Spain, or sorting shots from a hike in the Alaska, your workflow is ready when you are. Fast edits. Professional results. No laptop required.